Pages

Saturday, December 1, 2012

Christmas Tree Skirt

This Christmas tree skirt was a labor of love. Seriously. It took a long time. However, it is done. And, I'm actually really proud of it. It's pretty and unique and festive. Just what I wanted it to be.


So, here's how I did it. 

The base for the tree skirt was sewn last year. I simply re-purposed an old table cloth, kind of like this. My table cloth was rectangular to begin with, but still worked beautifully. I decided to line the fabric with vinyl for durability (these things spend all their time on the floor, getting bunched up, sat on, dripped on, etc.) so I bought another similar table cloth and made another skirt the same size. However, since vinyl doesn't need hemming, it needed even less work (hey, super) and was really easy to attach to the already finished and hemmed red skirt. Of course, I only attached the vinyl once the snowflakes were sewn on. That way, all my ugly stitches are hidden. Clever, right?

With the red skirt hemmed up, I began to make snowflakes. I found a lot of free crochet snowflake patterns online, including these and also these and also this one. Pinterest is a super great forum for finding a lot of free patterns. Also, remember that your browser will probably translate any pages that happen to be in foreign languages. And, if you can read a diagrammed pattern, you're in even better shape.


So, I made a lot of these. I used something like this, a fine cotton crochet thread. And, of course, when you first make them they will be very soft. Picots and other details might not show well since the snowflake isn't yet blocked or starched. You'll need to do that next. I stretched out cellophane on my rug with straight pins at each corner and along each side, just enough to keep the plastic in place. Afterward, I pinned down my snowflakes and used a thin mod podge (I thinned it out with water, using about a one:one ratio) to coat them all using a foam craft brush. I flipped them when they felt tacky and slathered the other side. Then, I waited for them to dry completely. You might notice that the ones below have some glitter on them - these were actually used for a different project (why, yes, of course I will post it when it's finished) but the stiffening technique was the same.


You can see that afterward, they are quite stiff and durable.


Then, I worked to lay them all out on the skirt, trying to find a pattern that I liked.


Once I was happy with their placement, I sewed each of them on by hand. I could have used the machine, but worried about the dried glue gumming up the works. Whatever. As you can see, I wasn't very meticulous about it. Hey, they're on. And they'll stay. What more do you want? I did put down a drop of fabric glue at the point of the knot when I was finished, just to make sure.


 I also crocheted an edging which I sewed around the circumference of the skirt. I didn't stiffen it as I did the snowflakes. I don't have a pattern for it drawn up, since I sort of made it up as I went along. But there are a lot of great edging tutorials online. Here's a pretty one.


I may have screwed it up a couple of times as I sewed. Aligning that sucker while keeping the vinyl from slipping was, at times, a pain in the ass. We don't need to talk about it. We just need to be grateful for the ripper. The almighty ripper.


And, there you have it. All done and ready for the tree. 


Wednesday, November 14, 2012

Pretty Fold-over Clutches

These fold-over, fabric clutches were made for my sisters as gifts. They're perfect for dressing up an outfit. You could, of course, use any fabric you like as long as the weight of it is appropriate for the project (or if you've added interfacing to make it so; I did add interfacing later in the project to give it more weight). These are a bit floppier and less stiff, but I like them that way.


They have one large pocket (closed with a zipper) and one small pocket (closed with a magnetic snap). The large pocket folds over to attach to the small pocket with a magnetic snap.


You'll need outer fabric, lining fabric, slide buckles (if you're adding the bow to the front), magnetic snaps (two pair for each clutch), interfacing (to strengthen the fabric for those magnetic clasps), and one zipper for each clutch. 

The size of all these materials is entirely up to you. I cut my fabric to fit the size of zipper I had on hand; I think they're about 9" wide or so. These instructions are general ones meant to give you steps to follow in making your own.

First, you will need to decide the size of your clutch and cut the appropriate rectangles of fabric from both your lining and your outer fabric. These are my prepared materials for one clutch:


The larger rectangles make up the entire clutch. When folded in half from left to right, they will make up the height of the clutch. This next photo demonstrates in more detail the composition of the clutch after the magnetic clasps have been added:


You can see the lower pocket has been placed and sewn on. The bow has also been pinned in place.

The bow is comprised of a long strip of lining material which I sewed into a tube and then cinched in the center with my slide buckle.


To create the smaller pocket, decide where you want to place your magnetic snap to seal the smaller pocket to the larger one. 


I then arranged right side to right side and sewed the top of the pocket, so that I could truly see its size. I top stitched the smaller pocket, too, so that it would lay nice and flat.


This is what it looked like all laid out, pieces in place, no snaps or zipper yet attached.


In the following picture, you can see that I am placing the smaller pocket onto the larger clutch in order to determine where those snaps will meet up. I've marked the spot for the snap with a red star. It will need to be attached to both the small pocket and the larger body of the clutch below.


You will also need to place another snap on the outside of this smaller pocket, since the clutch will fold over and attach here to close. Again, the larger part of the clutch closes here, so the female part of this pair will need to be attached on the larger rectangle.


Folding over the clutch, I can see where I'd like the snaps to meet: 


To place the magnetic snaps, I cut small slits in my material to let the snap through.


I then placed interfacing with matching slits cut into it over the top. I placed the securing metal piece down on top of that interfacing before pressing down those metal teeth to secure the snap in place.


Make sure that you are matching male and female parts when arranging your snaps. This way, they actually work! Place all of your snaps in the appropriate places so that your clutch will close as you'd like.

Next, you must add your zipper. 


Finally, sew all the way around your clutch, right sides together, leaving a small space open  in the lining for turning right side out.


Stuff the lining down inside the bag. Then iron the whole thing down. On both sides. Just to make sure its shape is nice and crisp.


Now, you can stuff it with your evening essentials, fold it over, and take it out on the town!


Then, make some more.

Tuesday, October 9, 2012

Cold Porcelain

Making some cold porcelain today! It's such great, versatile stuff. I love it for ornaments, small dishes (don't put food on these...) and other decorative dainties. In future posts, I'll be sharing a couple of my favorite ways to use it, but for now I'll just talk about making the stuff.

Here's what you'll need:

   
Mostly, I used this recipe to make my own cold porcelain clay:
* 1 cup Elmer's white glue
* 1 cup cornstarch
* 1 T mineral oil (I just used JoJoba Oil that I had)
* 1 T lemon juice, witch hazel, or clove oil (I used 1 1/2 T white vinegar instead - you need more of this since there's less acidity in the vinegar and you'll need to make up for that)

I also used cold cream (Ponds or whatever you have) in order to knead the clay after it had been cooked. This prevents cracking in the clay once it's dried. It also really keeps that sticky, gloopy glop from sticking to all your little fingers. Even though you should expect this to be slightly messy. Come on, you're making your own clay with glue.

I doubled the recipe and it worked just fine. Cooking time was longer, but it came together just as well as smaller batches have done in the past.

Step 1: Mix all of your ingredients together (except the cold cream, of course) in a microwave safe bowl.


Step 2: Microwave for 2 minutes at a time, stirring in between to make sure that your mixture is heating up and coming together evenly. It will begin to congeal, stiffen, and get harder to stir; all good things. When it looks about like the picture below, maybe even a little bit drier, it's time to take it out.

Side note: This stuff isn't toxic. It's made from mineral oil (I slather that stuff on my skin), white vinegar (we use it to clean fruits and vegetables), cornstarch (I bake/cook with that all the time) and Elmer's glue (it says non-toxic on the container!). Now, don't be a dummy and eat it (even though there are moments during the cooking process when it looks like delicious marshmallow fluff or icing), but also don't freak out that it's in your microwave or in a bowl that you'll use again for food once it's been thoroughly cleaned. Okay? Okay.


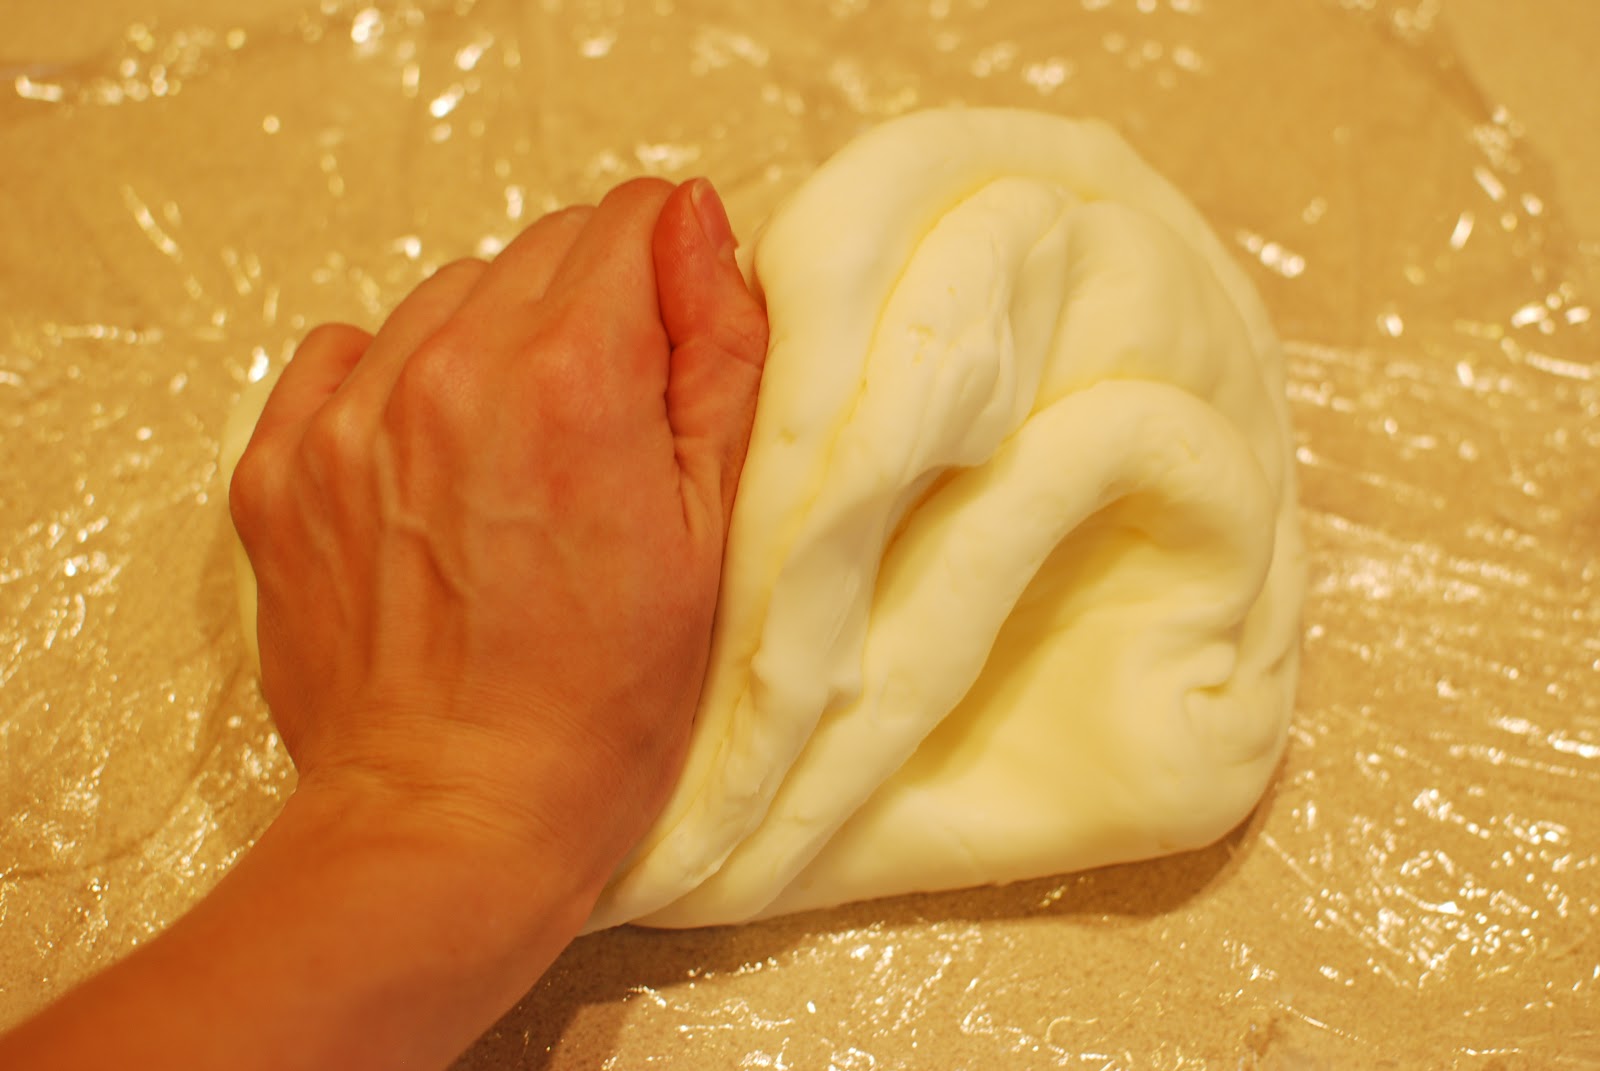
Step 3: Prepare your work surface. Your glob of goo will be super hot when it comes out of the microwave, so be careful with it. It can cool off a bit while you prepare the counter. You'll want to put down some plastic wrap on the counter because this stuff is sticky. And glue can be irritating to clean up - even though it will  come off with soap and water, I promise! Now, I did have to keep rearranging the plastic. It does stick a bit to the clay while you work to knead the stuff, but it's not too big a deal. I smeared some of the cold cream on the wrap itself and then lubed up my hands really well before handling the glob. It was mostly successful. However, I won't lie to you - I did spend some time with the manicure set removing the mixture from beneath my nails afterward. But we crafters like to get a little dirty. Wink.


Step 4: Knead, knead, knead me some clay! I've heard that the more you knead the stuff, the better it settles and the fewer cracks you will have in items that you make once they have dried. Knead until it's cooled down quite a bit. I think I kept at it for about 10-12 min. It should feel elastic and cool when you're done.


Step 5: Wrap that stuff tightly in cellophane. I separated mine into two balls, since I doubled my recipe. It should have cooled sufficiently while you were kneading to be able to do this. They look like cute balls of mozzarella. Don't eat them.


Step 6: Let your cold porcelain get cold. Ha. While it's cooling, wash your damn dishes. Do it now. Or you won't want to later. Why? Because you'll be up to your neck in fantabulous cold porcelain creations and you won't want to stop. And that's it. You're done.


Other Important Stuff: 

  • You can use this awesome stuff in lots of ways. One way is to dye it, using acrylic or oil paints. I used the latter. For my project, I needed some green, which you can see below. Just knead that color right in and you'll be golden. You can also paint your object after it's dried. If yo leave it be, it will be white and a bit translucent (not transparent) when dried.
  • Cold porcelain shrinks as it dries, up to about 30%, so keep that in mind when planning your creations.
  • You'll need to seal it with something to keep out the moisture - the ingredients do revert back to goop when enough water gets to them. Think Wicked Witch of the West. So, use an acrylic sealer (or polyurethane or whatever you want) to prevent any melting or disintegrating. 


This stuff is SO much fun. Roll, knead, and shape your creations, let them dry, and enjoy.